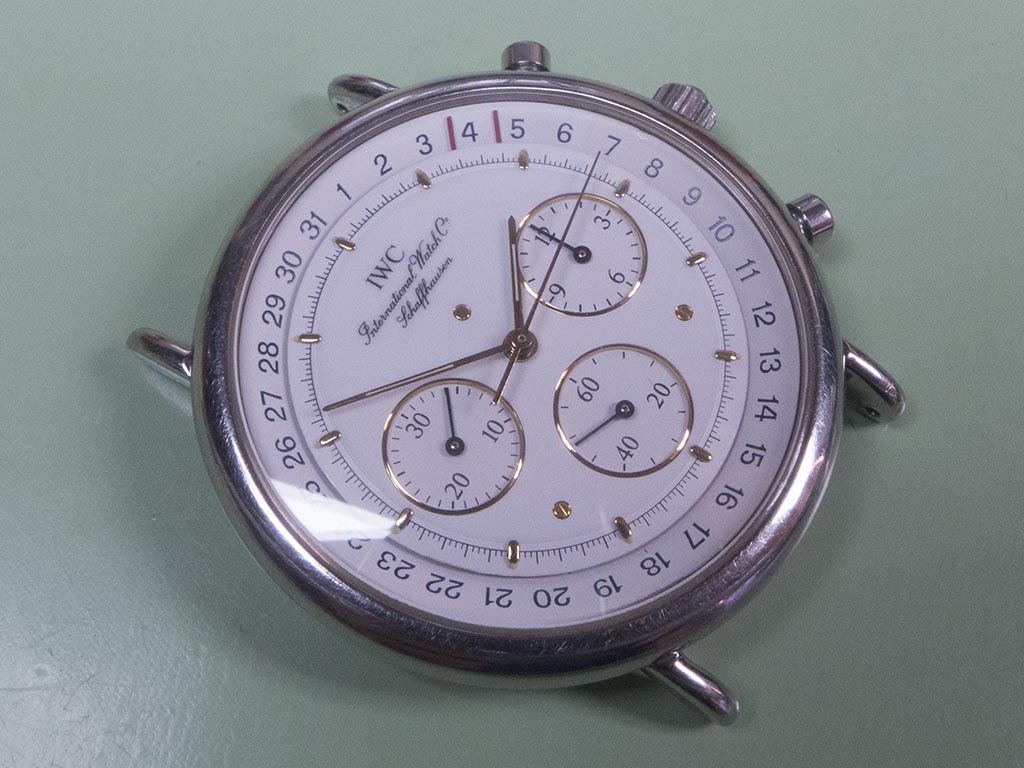
The International Watch Companies mecaquartz range of chronograph watches use a hybrid movement with quartz powered time and chrono functions coupled with a mechanical reset. The mechanical reset instantly snaps the registers back to the rest position as opposed to a fully quartz movement which has to advance them back to rest. The movements were based on the Jaeger LeCoultre calibre 630 and 631, the 631 having the addition of a moonphase indicator. These movements have two motors, one powering the timekeeping hands and the other powering the chronograph. The watch featured is based on the 25 jewel 630 calibre. As you can see from the photograph it has an unusual date indicator, much like a pointer style but different in as much as only the two red bars that frame the date are visible on the dial. It came in with various issues, the most immediate being that it didn’t run, neither the time keeping or the chronograph.

The caseback is a plain affair held on with four screws.

With the caseback removed the mechanical components are visible along with the circuit board, there’s also a nice touch with the IWC branded train bridge. The coils and circuit were tested and unsurprisingly they were found to be dead. The coils showed no resistance (open circuit) and the integrated circuit wasn’t generating any pulses. The project went on hold whilst new coils and circuit board were sourced (thanks Rob!).

Once these arrived (after having gone missing for a while with the courier!) the project started again. The movement was removed from the case, being very wary of the date indicator poking out of the side.


The handsets were removed, I always take a picture of the reverse of the hands in the order they come off to ensure they go back on their original pinions. Not so much an issue with these but when different size pinions are used it’s a handy reference.

The dial is a two layer affair, here the top layer has been removed.

With the dial and handset removed the strip down can proceed.

With the bridge removed the reset hammers and wheel hearts are visible.

With the reset mechanism removed you can see the start/stop lever. This lever turns the wheel at the top with the little finger on the side of it, when in the stop position this grounds the circuit board to stop the chronograph and opens the circuit to start it when the button is pressed. The brown tube at the bottom left is the chronograph coil.

The levers have now been removed which allows access to the timekeeping coil.

Both coils can be removed now.

And here they are removed. I decided to refit the coils before stripping any further to see if there were any other issues apart from the broken circuitry, it’s always handy to know what your facing before fully stripping the movement.

The new timekeeping coil with the old, as you can see the old has been coated with a sort of varnish to help prevent any damage to the fine wire the makes up the component.

And the chronograph coil. Whilst these look superficially the same they do have different resistance readings, the chronograph coil reading higher than the timekeeping one.

The new integrated circuit board, the replacement lacks the trimmer of the original.

Whilst inspecting the new coils I noticed the end cap of the timekeeping coil seemed not to be level on the metal plate it’s bonded to. Not worrying too much I figured that once it was screwed in place that should pull it together firmly.

The coils were fitted, but when I went to fit the lever work the timekeeping coils cap appeared loose. I picked up the movement to inspect an it was apparent the cap wasn’t actually bonded to the plate. This was a big concern as the only thing keeping the cap attached was each end of the fine wire that is coiled around the plate. This wire is about a tenth of the thickness of a human hair and as such isn’t designed to take any load. I decided to gently remove the coil and bond the cap back on securely. However during the removal process the inevitable happened and one of the wire ends became detached from the contact on the cap. You can see where the metal plate has be scarified to provide a key, but no evidence of any adhesive!

This was a big disappointment as the coil was brand new, and a bit of setback as sourcing these coils took weeks and they weren’t cheap! The alternatives were to send it back (abroad) and be prepared for a lengthy delay whilst the supplier decided whether or not to replace it, or reattach the cap to the plate then do the same with the coil wire. I decided to try the latter. The cap was bonded back to the plate with some two part epoxy. You can see the two ends of the fine wire in this picture. The grey dot on the one that’s still attached is conductive adhesive. I cleaned the varnish insulation back from the broken end of the wire and cleaned the adhesive from the brass contact plate.

I then place a microscopic amount of conductive adhesive over the wire and left it to cure. Once fully cured I got my multimeter out and tested the circuit, the fix had been successful and it was showing the correct resistance.

The movement was reassembled to check for any running issues before stripping fully for a good clean and lube.

Unfortunately neither the chronograph nor the timekeeping side ran which indicated a further problem somewhere. As the electrical side checked out OK the problem must be mechanical. I noticed when pushing the crown back in from the time setting position that it felt a bit spongy, there was no positive click as you’d expect. This led me to believe that there was probably an issue with the hacking feature, on a quartz watch the movement is hacked not by applying a brake but by breaking the power to the integrated circuit. The watch was then fully stripped ready for cleaning and inspection.


The issue with the non running of the movement was down to this little chap, the stop lever. This was the shape it was in….

….and this is the shape it should be. Hardly much difference between the two photographs but enough to prevent making and breaking the stop/start circuit. This is why I try to see the watch running before fully stripping as I’d probably have missed this, not knowing that the component had been slightly bent out of shape.

As can be seen the mainplate was very dirty, showing evidence of battery leakage in the past. This leaking is what kills circuits and coils, when it gets left too long the acid can eat through levers and components too.


The components were cleaned and the reassembly began, there’s no photographs of this procedure I’m afraid as my cameras battery went flat just before I proceeded. Not good timing! The movement was assembled and with the straightened stop lever it ran beautifully. The only issue now was the sweep hand didn’t want to reset to the same position! The first thing I look for in these situations is the condition of the hands pipe. These do spread after they’ve been removed a few times so usually they can be nipped back up. When I inspected it closely I could see the pipe had actually split at some point, so there’s little wonder it wouldn’t reset.

This was another setback as the chances of finding an original replacement hand is pretty slim. I decided to try a fix I’ve used before, the only problem was I’ve used it on normal sweep hands never on chronograph ones. These are subjected to relatively high forces when reset so I wasn’t sure if it would work, however nothing ventured nothing gained! I cleaned the hands pipe and applied a miniscule dab of flux. I then heated my soldering iron and applied a dab of solder to the pipe. This fills up the tube and the crack.

Then with a tiny 0.2mm drill I hand drill the solder out of the pipe. As I mentioned this procedure can help rescue a sweep hand on a normal watch but will it work on a chronograph?

Well the hand was replaced and it actually worked – for about half a dozen resets! The problem with solder is it’s too soft to hold the hand firm against the resetting motion and it soon starts to give meaning the reset doesn’t remain consistent. I scoured my parts drawer for something suitable to use, any blued hands I had were far to heavy and mostly the wrong length. However I did find a lovely slender gold sweep hand which matches the hour and minute hand very well so this was fitted. If in the future if an original hand can be sourced it can always be fitted, however I think the gold one looks pretty good!


And with the chronograph running.


They came from the USA as I recall although I didn’t source them!
LikeLike
hey there nice work, were did you get the integrated circuits and coils? must been hard!!
LikeLike
Hi, I got one similar, missing the back and in need of repair.Would you be able to fix it? I know IWC parts are difficult to source though.
With regatds
LikeLike
If you can find the parts I can fix it! I didn’t source the parts for the one I repaired, the customer did that himself.
LikeLike
i personnaly recoil them by hands on my lathe
LikeLike
Excellent, I have a shed load of open circuit coils. Give me your address and you can recoil them for me – you must have very steady hands to recoil over 100m of varnished wire that’s thinner than a human hair (0.15mm) about 10,000 turns without damaging it. Hats off to you!
LikeLike
I have just written an article “How I fixed IWC Pilot’s Chronograph cal 630 – with a self-made magnetic coil” about my several tries to rewind the magnetic coil for JLC 630 (without professional equipment). I was not able to buy the right coil. I was searching everywhere for it. So, I decided to rewind the wire coil by myself. It is working, but it is time-consuming. Also, this is not a professional approach but rather a proof of concept only.
LikeLike
Very nice work and pictures!:-)
I also need coils, anybody know were to find them?
Thanks 🙂
LikeLike
I don’t – does anyone out there know?
LikeLike
Hello
Do you find the coils?
If you find help me please)))
Thanks, Roman
LikeLike
Read the post 5 above yours.
LikeLike
Hello,
where did you get the right iwc coil.
LikeLike
I didn’t, the customer supplied it.
LikeLike